Wednesday, June 20, 2012

Granola

I grew up on TJs ginger-almond granola (which I thought was pretty tasty at the time, granted), but was converted by a fellow from Eugene's The Lorax, who was visiting Berkeley and Lothlorien for a few days.  I have never eaten so much granola in my life as that week.


It took me a while to attempt it myself, but now that I have, there is No Going Back.  Fortunately (as the internet and most likely you have already realized), it's really pretty easy and tastes about a thousand times better than much of the stuff on the market.

Technically, the word I wrote down at the top of this recipe is "granaloa," which says something about the hour and/or mindset I was in at the time of recording.  I found it on the internet somewhere I am unable to recall (apologies to the since-forgotten blogger), and have adapted it as I like.  Have fun!


Saturday, June 9, 2012

Black Bean Salad with a Side of Orange and Jicima

The summer salad series continues with both alliterations and recipes.  These next two I thought wonderful served together, the spicy heartiness of the black beans complemented by the sweet, brisk refreshment of oranges, jicima, and radishes.  Both of the recipes come from Annie Somerville's Fields of Greens (which, by now, you have probably realized I am obsessed with).  For the bean salad, the changes I've made reflect concessions to cost and convenience, and for the orange salad, changes reflect misreading the recipe, but liking the final result.


Spicy Black Beans with Chilies and Lime
Adapted from Fields of Greens by Annie Somerville


Serves 4-6.


Ingredients:
2 19-oz cans of black beans, drained and rinsed*
Salt and pepper
1/2 medium-size carrot, diced (about 1/4 cup, prepped)
1/2 celery rib, diced (about 1/4 cup, prepped)
1/3 red bell pepper, diced (about 1/4 cup, prepped)
Zest of 2 limes (about 1 1/2 tsp)
3 Tbl fresh lime juice (the juice of the two you zested should be enough)
2 Tbl Champagne vinegar**
1 garlic clove, minced
3 pinches of cayenne
1/4 cup olive oil
1 or 2 jalapeno chilies, seeded and diced
2 heaping Tbl chopped cilantro
1 Tbl chopped mint (optional)


Directions:
Put the (rinsed, drained) beans into a large bowl.  Bring a small pot of water with 1/2 tsp salt to a boil.  Add the carrot, cook for 30 seconds, then add the celery and cook for another 30 seconds.  Drain, rinse with cold water, and add to the beans.  Add the bell pepper to the beans.


To make the dressing, combine the zest, lime juice, vinegar, garlic, 1 tsp salt, and 1/4 tsp black pepper in a jar, and shake to combine (or whisk them together in a bowl).  Add the olive oil, and shake again.  Add the dressing and the jalapenos to the salad (the salad should be spicy, but if you're worried, add half the jalapeno, taste, and add more as desired).

Let the salad marinate for at least 30 minutes.  Add the cilantro and mint before serving.

Serving Suggestions: Cotija (or Queso Fresco, or Mexican cheese) is pretty widely available these days, and pretty delicious sprinkled on top.  Quick pickled onions could be good, and I know the orange-jicima salad is!

*Note: The original recipe calls for 1.5 cups (9oz) of dried black beans, sorted and soaked overnight.  Drain and rinse the beans, put them in a large saucepan, cover with cold water, bring to a boil, and then cook at a gentle boil 20-25 minutes (until tender but not falling apart).  When the beans are done, proceed with the recipe as written.
**Note: If you can find Champagne vinegar for cheap, that's fine.  Otherwise, just use sherry vinegar.

Wednesday, June 6, 2012

Pita

Once summer starts in Davis (and it has, no matter what the calendar says), I become a permanent fixture of the porch.  Breakfast turns into reading the news turns into work in the morning, then the late afternoon wanders in with a book (and quite possibly a beer).  I like to eat late, when the sun has set, but it is not quite dark and still a little warm.  I like to eat lightly, and ideally with my fingers, some bread and cheese and tomato, or a few salads with some warm pita.


The other weekend I was in a park, instead of parked on the porch.  One of the local high schools was putting on a free, outdoor play ("The Compleat Works of Wllm Shkspr (Abridged)," the first half of which was hilariously bad, the second half was just hilarious - think Hamlet with only three actors, done forwards, fast forwards, and backwards in under five minutes), and the Professor and I met some friends there, to watch and have a picnic.  I'm not sure if the things I brought were ideal finger foods, but they were certainly delicious, and would be perfect for a late supper on the porch.  I will post the salads over the next few days, but start with some pita with your next rendition of your favorite salad.


Thursday, May 31, 2012

Some days.

Some days, you're done with a frigid office and four walls between you and the sound of, well, anything.


Some days, you're tired of your cannibalistic chickens.


Some days, you need a Franzi, Paul Simon, and a porch.


Cheers.

"F**k it.  I'm gonna build a fetish costume for my chicken."
Serves one (or many, as needed).


Ingredients:
One (or many) Franziskaner Weissbier, cold
One porch, warm and spattered with sunlight
One Paul Simon album, preferably Graceland

Directions:
Sit on porch.
Pour beer into attractive glass of your choosing.
Start album.

Walk on.

Wednesday, May 30, 2012

Ragout for You

I find that ice cream has been a tricky subject.  Don't get me wrong - it has many things going for it, including being delicious and relatively easy to make (invest in an ice cream maker.  Do it.).  Unfortunately, I have not yet figured out a way to photograph a pot of liquid in a New and Exciting way. Plus, as we near the 100+ days of summer in Davis, photographing a bowl of ice cream becomes something like kitchen parkour.  You have thirty seconds until soup.  Go!

So, instead of blogging about ice cream, I wore the ice cream socks.


That done, meet the fava bean.


My relationship with said bean began a year or so ago, when I moved into the Owl House, and discovered a circular jungle in the back yard.  The fava forest was Rainbow's doing, and her legacy lives on: a few beans from last year sprouted.


Of course, I had no idea what to do with these things.

When confronted with a new green thing to eat, I often turn to Chez Panisse Vegetables to get a feel for how to prepare it, what might be done with it, what flavors work well with it.  The recipes tend to be simple (and generally delightful), which is exactly what I need when I'm getting to know a new vegetable.  The recipe that caught my eye this time was for a fava bean ragout.  I added the orzo to make it a light late spring meal.

Happy explorations!

Fava Bean Ragout with Orzo
Adapted from Chez Panisse Vegetables by Alice Waters
Serves 2 as a light meal


Ingredients
2 1b whole fava beans
1 large clove of garlic, peeled and chopped fine
1 small sprig of rosemary, leaves removed and chopped fine
Olive oil
Salt and pepper
1 tsp lemon juice
1/3 cup orzo
parmesan


Directions


First, start a pot of water for the orzo.  When it boils, add the orzo, and cook 7-10 minutes, until al dente.  When it's done, drain it and set it aside.

To prepare the fava beans, you shell the tough outer pod:


You'll be left with a pile of beans, which (secretly) have yet another skin that you'll remove by blanching the beans: bring a pot of water to a boil, add the favas, and simmer for a minute.  Drain the beans,


then find the Professor to come help you peel them.


I found it worked best to break the skin by pinching it with a fingernail, then gently squeezing them out.  You'll be left with a pile of bright green, totally naked favas.  Put the beans in a deep, not too wide pot, and add olive oil and water in equal parts just to cover (I found I needed 1/3-1/2 cup of each).  Add the finely chopped garlic and rosemary leaves, 1/4 teaspoon of salt (to start), and several good grinds of pepper.  Bring the mixture to a simmer, cover the pan, and let simmer for 5 minutes - until the beans are tender.  When the favas are ready, add the orzo and the lemon juice, and stir to combine.  Taste for salt and pepper, and adjust as you like (careful with the salt - I like to serve it with parmesan, which is salty on its own).


Serve with grated parmesan on top.  (Like I said.)  We, um, at it all that night, but I bet it would be delicious cold as well.

Thursday, May 24, 2012

The Perfect Hard-Boiled Egg.

I wasn't even going to post until later this evening...but lunch happened.


See, I've been reading this book called "How to Read a French Fry," by Russ Parsons.  It's a semi-scientific book (emphasis on semi), the goal of which seems to be to get you to understand why things work the way they do, for some subset of the large number of miracles that happen in kitchens every day.


The relevant chapter is on eggs.  Though really, all you need is a sentence or two:

The Perfect Hard-Boiled Egg
Paraphrased from "How to Read a French Fry" by Russ Parsons


Directions:
Put egg in small pan and cover with water.  Bring water to a boil, turn off heat, let water cool to warm (you could leave your hand in it indefinitely).


The result:


Voila!  Your perfect egg is done.  No gray, no rubber, just delicious.  What do you do with your hard-boiled eggs?


Thursday, May 17, 2012

How I eat.

The free food pile was threatening to overwhelm its corner.  At the time of this recipe, it contained: 2 half-open bottles of red wine (Two Buck Chuck for the win(e)!), a bottle of Cointreau, a mostly-gone bottle of tequila (notice the cork floating), two prickly pears, two limes (jalapeno-prickly pear-lime margaritas were the order of the night), a clove of garlic, and this horrible attempt at hazelnut-white chocolate-rose macarons (the piece of paper is a warning sign to all potentially interested parties).  (Since then, we've added several bottles of hot sauce, tamari almonds, hot dog buns, and some mate.)  The tragedy of the commons at work.


Clearly, something had to be done.  Fortunately, in addition to the dire state of The Corner, I had plans to attend the [Legendary] Anderson Valley Beer Festival.  The solution was then obvious - what better way to prevent the beer from going to our heads than these:


I don't even have to tell you what these are, for they have been marked with the international symbol of the peanut butter cookie.  This particular recipe was adapted from one of my favorite informational food blogs - the Joy of Baking.

When I took the pictures for this entry, I was thinking a lot about the banana bread post.  I have a image in the middle of the post of a slice of banana bread on a plate on the table.  I had just served it to David, and took a picture before it disappeared.  I like the way it sits, slightly tumbled, onto the plate.  It looks like food, it looks ready to be sampled, munched, gobbled...eaten.


That is how I serve food, and I much prefer that photo to the one I have at the end of the post.  It is true that I like a tablecloth and I like beautiful plates and I like elegant utensils...but I don't go a lot further than that.

I don't actually tie a scrap of purple cloth around my fork and eat banana bread on a lace doily.

I do, however, eat peanut butter cookies from a glass plate in the sunshine.  And I do drink milk out of mason jars.  Maybe you do, too.


Monday, May 7, 2012

A not-so-new thing.

Some times I feel like it is impossible for me to invent something new.  Naturally I'm not the only one to think so - the Bible has a quote about it...

Maybe I am just more aware of it lately.  Compared to fifteen, even ten years ago, the knowledge available to us now is so vast, and peoples' ability to access and disseminate information is so widespread (though, granted, far from universal), it has even changed what we remember (see article).

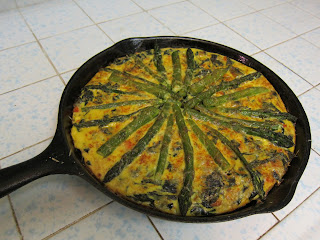
So whenever I think of a "new" recipe idea, I tend to google it - that's the graduate student in me.  What have people done before?  What do I like about those recipes?  What do I dislike?  Do I have a majority of the ingredients?  Has it been done before?  Secretly, I always hope that the answer to the last will be 'no,' or at least 'not as far as the internet knows' - which is pretty far.  My latest attempt to stump the food blogging world was the Polenta Frittata, a fancy way of saying that I have unprecedented quantities of chard, eggs, and polenta lying around.


Guess what?  It's been done.  (Though there were fewer hits than usual.)

It's frustrating in a way.  But it also calls to mind a book that I'm half-reading (you know, where it sits in the bathroom, and you open in randomly when you're brushing your teeth) - My Story as Told by Water by David James Duncan.  At one point, he's recalling a conversation he had with a professor with philosophy, Henry.  Henry is unusual - he tends to say beautiful and profound things in the throes of a conversation, but forgets what he says fairly immediately.  He totally lacks a sense of possession of his words.  Duncan, being a great fan of Henry's analysis of a certain book (A River Runs Through It), takes it into his head to prove to Henry how amazing he is - even if he doesn't realize it - by repeating his words and insights.  When Duncan concludes, Henry applauds him, and refuses to take credit for the performance that had just occurred.  Duncan then begins talking directly to the reader (I quote):
And the more I thought his refusal over, the more impressed I was with it.  The trout we catch in these hard-fished Montana rivers have often been caught by some previous woman or man; the day we catch one ourselves, we are no less alone on the river, and the trout is no less beautiful for its previous capture.  In Henry I'd met a man with no sense of proprietorship in the presence of true words.  In one sense I was, as I'd said, a mere parrot, but in another sense I'd plucked Henry's insight off the radio and taken it to heart.  Henry honored this second capture as the solo philosophical event it was.  He was loving a neighbor's insight as one loves one's own.
I find a particular resonance with the sentence about catching a fish that has already been taken and released.  My attempt at a polenta frittata is no less of an accomplishment - there is value in a journey undertaken, no matter how many times it has been traveled by others.  And my experiences cooking and eating, photographing and writing are no less worthy for the similar endeavors completed previously.

It is with joy that I make my own experience, and share it.


Polenta Frittata
A blend of many recipes, to be honest.


1/2 recipe of grilling polenta (recipe follows)

1 large bunch of chard, stems removed
1 medium yellow onion
1 small carrot (for the look - bell pepper would work just as well or better)
Salt
Pepper
7 eggs
1/2 cup whole milk
1 cup cheddar cheese, grated
1 tsp lemon juice (optional)
12 stalks of asparagus, whole
Cayenne (optional)
Parmesan cheese (optional)

To Serve:
Salsa roja (recipe follows)

Directions:
  1. Preheat oven to 350F.
  2. Clean and dry the chard thoroughly, and chop into small pieces (1/2"x1" or so - bite size).  (I tend to use Swiss chard, partly because that is what we have most of, but partly because rainbow chard may color your frittata in ways undesirable.)
  3. Dice the onion and the carrots.
  4. Heat olive oil in a large saute pan.  Add the onion, and saute until translucent.  Add the carrots, cook until almost done.
  5. Add the chard (in batches if necessary) and cook until wilted and tender (try not to add any water.  If you do, drain the vegetables before adding to the egg mixture.)
  6. Meanwhile, cook the asparagus (steam or saute them), and mix together the eggs, milk, cheddar, and salt and pepper to taste (I used ~1/2 tsp salt and 1/4 tsp pepper) in a large bowl.
  7. When it has cooked, add the chard-onion-carrot mixture to the egg mixture and mix to combine.  Add the lemon juice.  Return to the saute pan to warm it.
  8. Heat oil in an oven proof, large skillet (mine was cast iron, 9", and 3" deep).  Cover the bottom (as completely as possible) with squares of polenta.  Saute the polenta briefly, flipping once.
  9. When the egg-chard mixture is warm, pour into the polenta skillet.
  10. Arrange the asparagus on top, and sprinkle with cayenne, if using.  Grate parmesan over the top, again, if using.
  11. Bake 20-25 minutes, or until the eggs have set (try not to overbake!  Overbaked frittata is not delicious).
  12. Let cool briefly, then cut and serve with a dollop of salsa roja.


Polenta:
From Fields of Greens by Annie Somerville

Ingredients:
6 cups water (5.5 cups if you intend to grill the polenta)
1.5 tsp salt
1.5 cups polenta (coarse cornmeal)
1/4 tsp pepper
Cayenne (optional)
2 Tbl unsalted butter
1/2 cup grated Parmesan cheese, about 1.5 ounces

Directions:
  1. Lightly oil a 9"x13" baking dish and set aside.
  2. Bring the water to a rapid boil in a large, deep sauce-pan.
  3. Add the salt, then add the polenta in a stream, whisking constantly.
  4. Reduce the heat and cook at a low boil (think bubbling mud pits) for 20-25 minutes, stirring frequently, and adding more water if absolutely necessary (but really, only if you fear burning and a cement-like apocalypse), until the grains have opened up and the polenta is fairly smooth.
  5. Remove the pan from the heat, and add the pepper, butter, cheese, and cayenne (if using.  I usually don't).
  6. Pour the hot polenta into the baking dish, and let cool.
  7. For grilling, cut the polenta into squares (~2x2").
Note: When I originally made this, I made a double recipe, which is an absurd amount of polenta.  The polenta frittata was a desperate attempt to get rid of some of it.  I'm not sure how long the polenta keeps in the refrigerator - I had used it all within 7 days.  But it will keep at least that long.


Salsa Roja:
Adapted from Fields of Greens by Annie Somerville


Ingredients:
2 Tbl olive oil
1 medium yellow onion, chopped small
1 tsp ground cumin
Salt
10 large garlic cloves
1 28-oz can diced tomatoes (I like Muir Glen fire-roasted tomatoes)
1/4-1/2 cup New Mexico Chile puree
1/8-1/4 cup chipotle puree

Directions:
  1. To make the New Mexico Chile puree, take 10-20 dried New Mexico chiles, de-seed and de-stem them, then soak them in boiling water for 20-30 minutes.  Transfer the chiles using a slotted spoon to a blender.  Add a little of the chile water, and attempt to blend.  If it doesn't work, add a little more water.  The idea is to get a thick paste - similar to tomato paste, maybe a little thinner.  If there are large pieces of skin, strain the chile paste before using.  As far as I can tell, this will keep indefinitely in the fridge, and makes an excellent basis for red enchilada sauce.
  2. To make the chipotle puree, take a can of chipotles in adobo sauce, and blend the contents to a paste.  This will keep indefinitely in the fridge.
  3. Heat the olive oil in a medium sauce pan.  Add the onion, cumin, and 1 teaspoon of salt.  Saute over medium until the onion begins to become clear and release its juices (say, five minutes).  
  4. Add the garlic, and saute another five or so minutes, until the onion is soft.  
  5. Add the tomatoes and the chile purees (I recommend adding the smaller amount to start, then adjusting for flavor (and spice!) as you like).
  6. Simmer for an hour, adding water as necessary so that the sauce is a consistency of your liking.
  7. Serve at warm or at room temperature (it makes a great topping for grilled polenta - not just the polenta frittata!).
A few kitchen notes:
The salsa roja freezes very well.  Since the recipe makes about 4 cups, you might well want to put some away!

Thursday, May 3, 2012

What I found in Paul's cupboard.

Really, it was not my intent to pry.  I was just looking for the New Mexico chiles Paul keeps on his top shelf.  But lo, at eye level, were five of the most perfectly rotted bananas I had ever seen (as well as some manner of food item which had, with great success, disguised its original form with green mold).  I found the chiles, flung la terreur vert into the garbage, and allowed the bananas to continue on their path to enlightenment - I had other plans that day.


Nobly, they waited for the time when I had time to deal with this culinary find.  I pondered a roasted banana ice cream, but I still have half a quart of the coffee ice cream left over, so I decided to go with the classic.


My mother doesn't bake much.  She cooks almost every night, her salad dressings are to die for (as are her salads), and I'll share her quiche recipe soon enough.  But cookies, cakes, and all their delightful cousins are just not things she makes on a regular basis.

There are a few exceptions to this rule.  And let me tell you, those exceptions are executed perfectly.  Her Dutch apple pie and her brandy cake are requested weeks in advance.  You can find a yogurt container filled with her bran muffin batter in my fridge every other month.  But the recipe I'm sharing today is for her banana bread.

Wait, what?  I know, I know.  There is no shortage of banana bread recipes on the internet and in cookbooks - I'm sure you've got your own favorite.  I myself used the Silver Palate recipe for many years.  (Try it coated with sesame seeds - visually lovely, and very tasty.)  But maybe you're like me, and you've got a standby, but you're keeping an eye out for more (actually, this is more reflective of my brownie quest than my banana bread quest).  And maybe this will catch your fancy.

One of the things I like best about this recipe, and probably about banana bread in general, is that it is so easy to play with.  Might be I have candied ginger and candied lemon peel lying around - sounds like banana bread!  Walnuts?  Pecans?  Why not.  Golden raisins?  Dried cranberries?  Orange zest?  Count me in!  I do have a habit of turning my banana bread into a kitchen sink, but it tastes so good…


I tried to rein myself in this time.  I wanted to emphasize the flavor and the texture of the bread, and not overwhelm it with mix-in's an' fillin's an' toppin's.  I do have a few things that I always like to do (the toppings at the end), and I've included those.


Banana Bread:

Ingredients:
1/2 cup unsalted butter, at room temperature
1 cup white sugar
2 large eggs
3 very ripe bananas
1 tsp vanilla extract
1.5 cups flour (I usually use half white, and half whole wheat pastry flour)
1/2 cup sour cream (I rarely have sour cream, and often have yogurt.  This makes an excellent substitution.  I imagine buttermilk would work as well, though I have never tried this.)
1 tsp baking soda
1/2 tsp salt

3/4 cup nuts (I usually use walnuts or pecans)
1/2 cup raisins or other dried fruit (or a mix!) or other exciting mix-ins
turbinado or other coarse sugar (optional)


Directions:

  1. Preheat oven to 350F.  Butter and flour two 8x4 loaf pans.  (You can use a smaller pan to get taller loaves, but I like the way the bread domes in the 8x4 pan.)
  2. Toast the nuts (a toaster oven at 350F for 3-5 minutes works great.  Keep an eye on them, though!  You want the nuts browned and smelling toasted and delicious, but not too dark.)  Once the nuts have cooled, chop them coarsely.
  3. Cream the butter and sugar until light and fluffy.
  4. Add the eggs one at a time, scraping down the sides after each addition.  (A Maida Heatter tip: crack your eggs into a bowl first.  If you're like me, and have troubles with shell bits falling in, this will save your life.  And your bread.)
  5. Add the vanilla, and the bananas.  Beat on medium until the bananas are completely broken up.  The batter will look slightly curdled, but this is normal.
  6. Add the flour, and beat on low until almost combined.
  7. Add the sour cream (or whatever you choose to substitute), and beat briefly.
  8. Add the baking soda (sift to make sure there are no lumps) and the salt.
  9. Mix until combined.
  10. Fold in your mix-ins of choice.
  11. Divide the batter evenly between the loaf pans, and sprinkle the tops with nuts and turbinado (if using).
  12. Bake about 50 minutes (I always check at 45, just in case), or until a toothpick comes out clean.
  13. Enjoy!


Monday, April 30, 2012

Two Things Involving Immersion Blenders

I love my immersion blender.  I remember not quite knowing what it was, or why people seemed to whip it out and immerse, without fear, into whatever-it-was that needed pulverizing.  But now that I have one, everything has changed.  I use it for black beans, for hot chocolate, and, now, for spinach soup and Vietnamese iced coffee ice cream.


One of those sounds slightly fancier than the other, but fear not!  The spinach soup has the added benefit of a parmesan custard from which you shave off cheesy, eggy curls that transform the spoonful of soup into something special.  Something delightful.  Something that makes you want to add a second custard to the bowl because they're really not that big and the first one is mostly gone...


I digress.  But since I'm already on the topic of soup, I'll start with that.  It is a simple recipe, one to use if you have an overload of spinach and a potato lying around.  (This is rare for me, actually.  Not the spinach - the potato.  I have a difficult time purchasing white vegetables.  If you have ever read Bunnicula, you'll know why.)  To be honest, it is more of an outline than a recipe and flexible enough to include the old head of broccoli that's been staring at you for the last week.


Spring Spinach-Potato Soup:


Ingredients:
2 Tbl olive oil
1 yellow onion, chopped small
2 small potatoes (I used yellow wax), cut into thick (2mm) slices (really, you just want them chopped so that they don't take too long to cook)
10 loose cups of fresh spinach (loose like you dumped them in the bowl loose)
3 cups of vegetable stock (I used this recipe)
other green vegetable odds and ends (broccoli, kale...)
salt and coarsely ground pepper to taste

3 parmesan custards (or half of this recipe)


Directions:
Heat the olive oil in a large-ish soup pot over medium heat.  Add the onion and saute until it starts to become translucent and begins to brown.  Add the potatoes, and continue to saute until the potatoes are cooked.  Stir frequently.

Add the stock (my stock is inherently very salty, so I didn't add much extra salt.  Salt at your discretion).  Once the stock begins to boil (you can accelerate this process by heating the stock in a pan before adding it), add the spinach (in parts, if necessary), and simmer until the spinach has wilted.  Blend the soup (if you use a blender, don't do too much at a time, and definitely use the lid.  Then, go out and buy an immersion blender.).  If the consistency is to your liking, excellent.  If not, feel free to add more stock until it's how you like it.  Cover, and simmer for 30 minutes.

Season with salt and freshly ground black pepper.  I like a lot of pepper (say 2 teaspoons or so), but you're free to adjust.

Prepare the bowls:
Warm your bowls.  (Please warm them.  It is so much nicer.)  Unmold a parmesan custard, and put it in the center of your bowl.  Pour soup around the custard.

Serve with a crusty bread.  And parmesan cheese, if you are like me and can't get enough of it.


----------------------------------------------------------------------------------------------------------------

Now, for your dessert.  This mix is intended for ice cream, but I think it would be perfect just to sip (provided you enjoy Vietnamese iced coffee), possibly with a few coffee ice cubes.


Vietnamese iced coffee ice cream:
From David Lebovitz's The Perfect Scoop
Ingredients:
1.5 cups sweetened condensed milk
1.5 cups espresso or very strongly brewed coffee
.5 cup half-and-half
pinch of ground coffee

Mix all ingredients together (the condensed milk is thick, so I used the immersion blender), then chill thoroughly.  Freeze according to your ice cream maker's instructions.


Bam!  Delicious, delicious ice cream.  Very good for ice cream sandwiches.


Note: if you want to infuse the coffee with some extra flavors (I used mint and cardamom), heat the half-and-half in a small sauce pan.  Remove from heat, and add the freshly-brewed hot (hot!) espresso, and then add your spices.  In my case, I added 2 cups of loosely packed fresh mint leaves, and 4 green cardamom pods.  Put the lid on the sauce pan and let sit undisturbed for an hour or so.  Strain out the spices/herbs, add the condensed milk and the ground coffee, and proceed as before with chilling.